Understanding JavaScript Promises

JavaScript, as a versatile and dynamic programming language, has evolved over the years to offer developers powerful tools for handling asynchronous operations. Promises, introduced in ECMAScript 6 (ES6), have become a fundamental part of modern JavaScript development. Let’s take a look at what JavaScript promises are, as well as focusing on the micro-task queue and callback queue, which are crucial components in the asynchronous execution model.

JavaScript Promises

Promises are objects representing the eventual completion or failure of an asynchronous operation. They provide a cleaner and more structured way to handle asynchronous code compared to traditional callback functions. A promise can be in one of three states: pending, fulfilled, or rejected.

  1. Promise States:
    • Pending: The initial state when a promise is created.
    • Fulfilled: The state when the asynchronous operation is successfully completed.
    • Rejected: The state when the asynchronous operation encounters an error or fails.
  2. Creating Promises
    • Promises can be created using the Promise constructor. This constructor takes a function (executor) as its argument, which in turn takes two parameters: resolve and reject. Developers use these functions to signal the completion or failure of the asynchronous operation.
const myPromise = new Promise((resolve, reject) => {
  // Asynchronous operation
  if (operationSuccessful) {
    resolve(result);
  } else {
    reject(error);
  }
});

Micro-Task Queue

The micro-task queue is a key component in JavaScript’s event loop mechanism, responsible for handling micro-tasks. Micro-tasks are tasks that have higher priority than regular tasks and are executed after the current script has run to completion. Promises use the micro-task queue to schedule their callbacks.

  1. Micro-Tasks:
    • Micro-tasks include promise callbacks, process.nextTick, and Object.observe.
    • Micro-tasks are executed in a single cycle of the event loop, ensuring they are processed before the next rendering.
  2. Promise Execution Order:
    • When a promise is fulfilled or rejected, its callback is added to the micro-task queue.
    • Micro-tasks are executed in order, allowing promises to be resolved before other tasks in the callback queue.

Callback Queue

The callback queue, also known as the task queue or message queue, is another integral part of the event loop. It stores tasks that are ready to be executed, allowing asynchronous operations to be handled in a non-blocking manner.

  1. Callback Execution:
    • Tasks in the callback queue are executed after the micro-tasks.
    • Regular tasks, such as event handlers and I/O operations, are added to the callback queue.
  2. Order of Execution:
    • The event loop continuously checks the micro-task queue and executes micro-tasks before moving to the callback queue.
    • This order ensures that promises are resolved before other asynchronous operations in the callback queue.

JavaScript promises have transformed the way developers handle asynchronous code, offering a cleaner and more maintainable approach compared to traditional callbacks. Understanding the micro-task queue and callback queue is crucial for mastering the intricacies of the event loop and ensuring the efficient execution of asynchronous operations in JavaScript. As you delve deeper into asynchronous programming, a solid grasp of promises and the event loop will empower you to build robust and responsive applications.

Understanding Grep

What is grep?

grep stands for Global Regular Expression Print. In simpler terms, it’s a command-line utility that searches through text using regular expressions.

The Basics

At its core, grep is a master of finding patterns. Whether you’re searching for a specific word, a line of code, or a complex pattern, grep has got your back. Let’s take a look at the basics:

grep "search_term" file.txt

This simple command will scour file.txt for instances of “search_term” and print out the matching lines.

Regular Expressions

grep truly shines with regular expressions (regex) – you can create intricate patterns to match exactly what you need. Wildcards, quantifiers, and character classes – the regex world is vast, and grep has got your covered.

grep "^\d{3}-\d{2}-\d{4}$" data.txt

In this example, we’re searching for lines in data.txt that match the pattern of a social security number. The ^ and $ anchor the regex to the beginning and end of the line, ensuring an exact match.

Recursion

Imagine you have a project with nested folders, and you want to find where a particular function is being used:

grep -r "function_name" project_folder/

The -r flag tells grep to search recursively. It will traverse through folders, unveiling every file that contains the sacred “function_name.”

Filtering

grep isn’t just about finding; it’s about filtering too. Let’s say you want to find all JavaScript files containing the word “error,” but you’re not interested in the case:

grep -i "error" *.js

The -i flag makes the search case-insensitive, ensuring you catch all variations of “error.”

Counting and Beyond

Sometimes you just want the numbers. How many lines contain your search term? grep is on it:

grep -c "search_term" file.txt

And to go even further, combine grep with other commands by piping:

cat log.txt | grep "error" | wc -l

Here, we’re counting the lines with “error” in a log file. cat displays the file, grep finds the errors, and wc -l counts the lines.

Essential Command Line Commands for Developers

The command line interface (CLI) is a powerful tool that developers can leverage to streamline their workflow and boost productivity. While graphical user interfaces (GUIs) are user-friendly, the command line offers a more efficient and flexible way to interact with your computer.

Here are some useful commands to keep in your developer toolbox:

  1. Navigating the File System:
    • cd <directory>: Change directory. Use this command to navigate between folders (add the directory path in the place of <directory>).
    • ls: List the contents of a directory. Add options like -l for a detailed list or -a to show hidden files.
    • pwd: Print working directory. Prints the file path of the directory you’re currently in.
  2. File Operations:
    • cp: Copy files or directories. Helpful for duplicating files (use cp <file> <directory> to copy a file to a directory – which can possibly overwrite files).
    • mv: Move or rename files and directories (to move files, use mv <file> <directory>, to rename a file, use mv <file-old> <file-new>).
    • rm: Remove files or directories (rm <file> for files or rm -r <directory> for directories). Exercise caution, as this command is irreversible.
    • mkdir <directory>: Create a directory (add the name of the directory in place of <directory>).
    • touch <file>: Create a file (add the file name in place of <file>).
  3. Text Manipulation:
    • cat <file>: Concatenate and display the content of files.
    • grep: Search for specific patterns in files.
    • sed: Stream editor for filtering and transforming text.
  4. File Inspection:
    • file: Determine the file type.
    • wc: Count words, lines, and characters in a file.
    • head and tail: Display the beginning or end of a file.
  5. System Information:
    • df: Display disk space usage.
    • free: Display amount of free and used memory.
    • top and htop: Show real-time system statistics.
  6. Version Control:
    • git: Essential for version control. Commands like git clone, git pull, git push, and more are crucial for collaborative development.
  7. Package Management:
    • npm or yarn (for Node.js): Manage packages and dependencies for JavaScript projects.
    • pip (for Python): Install Python packages effortlessly.
  8. Network-related Commands:
    • ping: Test the reachability of a host.
    • curl and wget: Download files from the web directly in the terminal.
  9. Process Management:
    • ps: Display information about active processes.
    • kill: Terminate a process. Use with caution.
  10. User and Permissions:
    • sudo: Execute a command with superuser privileges.
    • chown and chmod: Change ownership and permissions of files.

Mastering the command line is a key skill for developers. These essential commands empower developers to perform a wide range of tasks efficiently and are particularly valuable in server environments and automation scripts. As you become more comfortable with the command line, you’ll discover its potential for enhancing your development workflow and troubleshooting capabilities.

What is Load Balancing?

Load balancing is all about making sure no single server gets overwhelmed. Picture this: your favorite website or app can get crazy busy at times. Without load balancing, one server might end up feeling like it’s carrying the weight of the world, leading to slow response times or even crashing.

So, what does load balancing do? It’s like a traffic cop for network requests, spreading them out among multiple servers. This way, no server gets too bogged down, and everything runs smoothly.

Load Balancing Algorithms

  1. Round Robin: Servers take turns handling requests.
  2. Least Connections: The server with the least load (fewest active connections) gets first dibs on new requests.
  3. Weighted Round Robin: This one’s like Round Robin, but servers can have different “weights” based on their capacity – heavier servers get more requests.
  4. Least Response Time: Sends traffic to the server that’s quickest to respond – it’s all about efficiency.
  5. Hash: Distributes requests based on a key you define, whether it’s the client’s IP address or the request URL. If the set of servers changes, NGINX Plus can even apply a consistent hash to minimize the reshuffling of workloads.
  6. IP Hash: The IP address of the client decides which server gets the special treatment. So, when a request comes in, the server is chosen based on the client’s IP address.
  7. Random with Two Choices: This one randomly picks two servers and then makes a smart move. It applies the Least Connections algorithm to decide which server gets the request.

Benefits of Load Balancing

  • Scalable
  • Reduces downtime
  • Flexible
  • Efficient

Whether it’s at the application layer, transport layer, or network layer, load balancing ensures everything is running smoothly.

GitHub Tips and Tricks

GitHub is a developer platform that allows developers to create, store, and manage their code. If you’re new to GitHub, or if you’ve been using it for years and have yet to look into shortcuts, I figured I’d share a few handy GitHub tips and tricks.

GitHub Keyboard Shortcuts

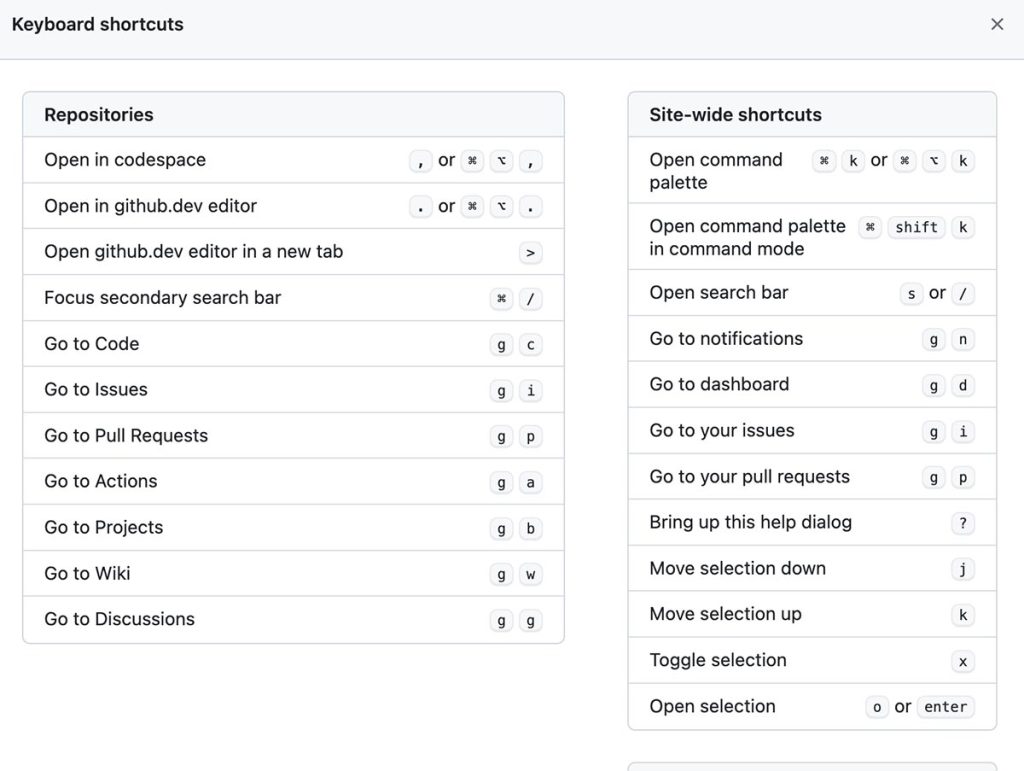
If you navigate to a repo page, and press ? (or Shift + /) GitHub will show you a modal with a list of quick keyboard shortcuts, as well as a link that displays all the available shortcuts.

GitHub shortcuts

One of my favorite ones to use is typing / or s when you’ve navigated to a repo page, since it allows you to pull up the file search.

Autodelete GitHub Branches

You can automatically delete GitHub branches after pull requests have been merged into your repo. This is great for managing your repo’s branches so that they don’t get out of control. To set up the automatic deletion of branches, navigate to the settings for a specific repo. On the “General” settings page, under the “Pull Requests” section, select “Automatically delete head branches.”

Link to Specific Lines of Code in a GitHub Repo

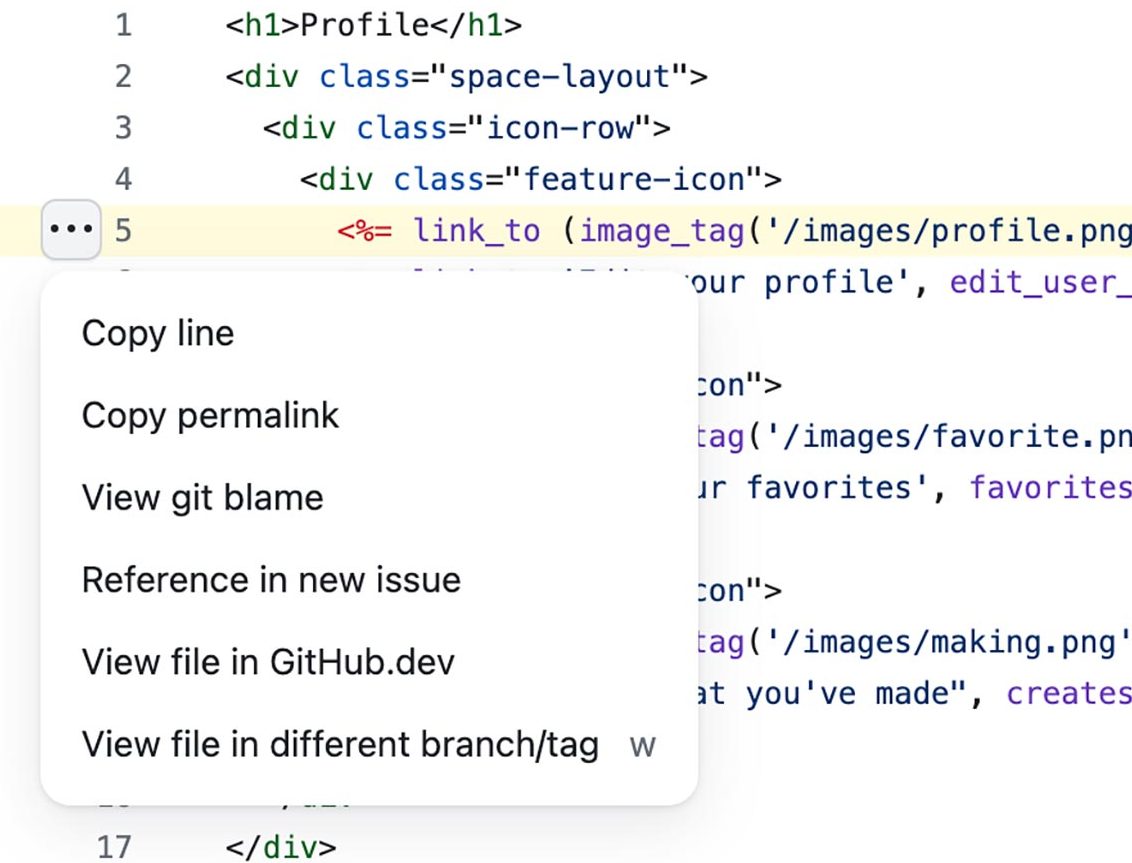
If you click the number beside a line of code, it will highlight the line and display a few menu options. If you click “Copy permalink” you’ll have access to a link that will link to the code snippet even if the file is later updated or deleted on the main branch. If you hold down shift while selecting lines of code, you can select several lines to highlight and link to.

Close GitHub Issues Automatically with Keywords in your Commit Messages

You can automatically close issues fixed by commits by using a keyword followed by the issue number in the commit message, i.e. git commit -m "fixes #30"

Here’s a list of all the keywords you can use to automatically close issues:

close #30
closed #30
closes #30
fix #30
fixed #30
fixes #30
resolve #30
resolved #30
resolves #30

Handy GitHub URLs

GitHub uses a few URL patterns that are handy for getting access to diffs of code or even user avatars:

  • Avatars: https://github.com/<username>.png
  • Diff of a commit: https://github.com/<repo-owner>/<repo>/commit/<sha>.diff
  • Patch of a commit: https://github.com/<repo-owner>/<repo>/commit/<sha>.patch
  • Diff of a pull request: https://github.com/<repo-owner>/<repo>/pull/<id>.diff
  • Patch of a pull request: https://github.com/<repo-owner>/<repo>/pull/<id>.patch
  • Latest release: https://github.com/<repo-owner>/<repo>/releases/latest

Format your GitHub README.md with Markdown

When visiting a GitHub repo, GitHub will serve the repo’s README.md. You can make these documents pretty elaborate by including a project overview, info on how to run the project locally, deployment info, etc. I like to use a project’s repo as the single source of truth for that project and keep it updated as processes change and as adjustments are made to various environments. You can find some basic markdown formatting info via GitHub’s documentation. One helpful tip for markdown formatting that I enjoy using, is that the <details></details> tags allow you to hide/show content via a simple accordion.

Host Web Pages and Simple Applications with GitHub Pages

You can host a GitHub Pages site for free via your GitHub account. This is great for simple websites and applications. You can even customize the domain URL, but the out-of-the-box URL is <your-github-username>.github.io/<repo-name>. You can find out more about using GitHub pages here.

What is the Difference Between null, NaN, and undefined in JavaScript?

The other day I was thinking about how earlier last year, I was interviewing like crazy, and sometimes I had recruiter phone screens where I was quizzed on various JavaScript terms. As I think of some of the questions I’ve been asked previously, I plan to write articles focusing on these questions and answers.

NaN

NaN means Not a number, and it denotes the value of an object is not a number. If you look at typeof NaN it will return 'number' since NaN is a numeric data type that is undefined as a real number. NaN can be returned if you do one of the following:

  1. Convert undefined into a number
  2. Convert a non-numeric string into a number
  3. Divide zero by zero
  4. Divide infinity by infinity
  5. Operation where the result is not a real number
  6. Method/expression’s operand is or gets coerced to NaN

null

null means the object is empty. It’s an assignment value that can be assigned to a variable that has no value.

undefined

undefined means that the object doesn’t have any value and is undefined. This happens when you declare a variable and don’t assign a value to it.

How to update Node to the latest version?

Node.js is a JavaScript runtime environment that runs on the V8 JavaScript engine and executes JS code outside a web browser. When developing locally, you’ll want to ensure that you keep Node updated for various projects to ensure you’re protecting applications from vulnerabilities and bugs.

NVM is a great tool for installing different versions of Node and switching between different versions for various projects. You’ll first want to install NVM. Once installed, you can install versions by doing the following:

Run nvm install [version] within the command line (replacing [version] with the version of Node you’d like to install).

Useful NVM commands

// check version of Node
node -v // can also use node --version

// list all locally installed versions of Node
nvm ls

// install specific version of Node
nvm install 20.10.0

// set default version of Node
nvm alias default 20.10.0

// switch version of Node
nvm use 20.00.0

// install latest stable version of Node
nvm install stable

How to specify what version of Node to use in a specific project

Within a project’s root directory, you can specify the version of Node that NVM should load by creating a .nvmrc file. You can generate this file by running the following command in the project’s root directory: node --version > .nvmrc

How to update dependencies in your package.json?

To update dependencies in package.json files, you can use npm, the package manager for Node.js:

  1. In the terminal, navigate to the root directory of your project and run npm install or npm i to install all the dependencies in your package.json
  2. To update a specific dependency, run npm update package-name (package-name is the name of the dependency you want to update, so adjust that text within this command).
  3. To update all dependencies, run npm update

To update npm itself, run the following:

npm install -g npm@latest

Useful Regular Expressions for Developers

A regular expression, or regex, is a sequence of characters that specifies a match pattern in text. Often times regex is used for form validations and string-searching algorithms. Here are a few regex that are handy for developers:

Letters

  • Domain: ^([a-z][a-z0-9-]+(\.|-*\.))+[a-z]{2,6}$
  • Email: ^[_]*([a-z0-9]+(\.|_*)?)+@([a-z][a-z0-9-]+(\.|-*\.))+[a-z]{2,6}$
  • Letters only: ^[a-zA-Z]+$

Numbers

  • Numbers only: ^[0-9]*$
  • Positive numbers: ^\d*\.?\d+$
  • Negative numbers: ^-\d*\.?\d+$
  • Numbers with spaces and parenthesis: /^(?:\+\d{1,3}|0\d{1,3}|00\d{1,2})?(?:\s?\(\d+\))?(?:[-\/\s.]|\d)+$/
  • Phone number: ^\+?[\d\s]{3,}$
  • Phone number with code: ^\+?[\d\s]+\(?[\d\s]{10,}$

Useful for Inputs

  • Letter and numbers only: ^[A-Z0-9]+$
  • Match blank input: ^\s\t*$
  • Match no input: ^$
  • Match new line: [\r\n]|$
  • Match URL: ^http\:\/\/[a-zA-Z0-9.-]+\.[a-zA-Z]{2,3}$
  • Match white space: ^\s+$
  • Match multiple white space: ^.\s{2,}.$

Handy Git Commands

Git is a version control system that tracks changes in a set of files, which is used by developers to coordinate work done for various projects. Here are some useful git commands that can help with your workflow:

General Commands

  • git status to see what changes have been made locally
  • git add . to commit all locally edited files in the repo
  • git add <file> to add a file to the next commit
  • git rm <file> to delete a file in the next commit
  • git mv <file> to rename a file in the next commit
  • git add -p is useful if you’ve done too much work for one commit, ? is a useful command to print all
  • git cat-file -p <sha> prints the contents of blobs (sha refers to the SHA or hash that git assigns to each commit)
  • cat .git/HEAD to see what HEAD is pointing to

Stashing

Stashing your work is useful if you’re moving between branches when you’re in the middle of work. It’s a safe, non-destructive way to save your work.

  • git stash to save uncommitted work
  • git stash list to view the current stashes that are available
  • git stash apply applies the last stash
  • git stash apply stash@{0} to apply a specific stash (in place of the 0 you can add the number associated with the stash from your git stash list that you’d like to apply)
  • git stash --include-untracked to keep untracked files in your stash
  • git stash save "WIP: working on recent bug fix" in place of the text in the quotes here, you can add a name for easy references when viewing the list of your stashes and figuring out which stash to apply on your current branch
  • git checkout <stash name> -- <filename> grabs a single file form a stash
  • git stash show stash@{2} to show the files changed

Keeping Your Stash Clean

  • git stash drop to remove the last stash
  • git stash clear to remove all stashes

Logging

  • git log to view an overview of the most recent git commits
  • git log --since="yesterday" to view commits from a specific time period. You can also pass arguments like git log --since="2 weeks ago"
  • git log --name-status --follow -- <file> to log files that have been moved or renamed
  • git log --diff-filter=R --find-renames to find files that have been renamed
  • git show <commit> to show commit and its contents
  • git show <commit> --stat show files changed in commit
  • git show <commit>:<file> look at a file from another commit

Fixing Mistakes

  • git checkout -- <file-path> overwrites the working area file with the staging area version from the last commit (this operation overwrites without warning so use with caution)
  • git clean will clear your working area by deleting untracked files (this operation cannot be undone). Use the --dry-run flag to see what will get removed
  • git reset moves the HEAD pointer, modifies files for commits (can change history)
  • git revert <commit> is the safe reset (creates a new commit that introduces the opposite changes from the specified commit, the original commit stays in the repo)
  • git reset --hard HEAD use this command if your staging area has gotten really messed up and you want to blow away all of your local work
  • git commit --amend if you need to amend your latest commit
  • RERERE (Reuse Recorded Resolution) is a tool that remembers a previously used solution for a merge conflict. Set git config rerere.enabled true within a project to have access to this tool. You can also set it globally with git config --global rerere.enabled true

Rebasing

Rebasing your feature branch with main will help keep your development work up-to-date with the latest changes that have been committed to the repo. This will help make merge conflicts more manageable whenever it’s time to merge in your feature work.

  • git rebase main makes history of current branch cleaner and makes managing merge conflicts easier
  • git rebase -i <commit to fix> addressing specific commits

Working with GitHub

  • git clone <project reference to clone a GitHub repo locally
  • git pull performs a git fetch && git merge to ensure the latest version of a branch has been updated on your machine
  • git push origin <name-of-branch> to push any changes to the remote repo
  • git pull --rebase will fetch, update your local branch to a copy of the upstream branch, then replay any commits you made via rebase (this doesn’t work well on branches with local merge commits, it works best when branching off master and working on a feature)

Local Destructive Operations

When performing a destructive operation, make sure you properly stash your work so you don’t accidentally delete any of your work in progress. Use git stash --include-untracked to include working area changes in your stash.

  • git checkout --<file> if file is presnt in staging, it will be overwritten
  • git reset --hard overwrite changes that are staged and in working area
  • rebase, amend, and reset can rewrite history (if your code is hosted or shared, never run git push -f which forces a push of your changes)

Configuring Your Editor

To customize which editor git opens when you run a commit with no -m flag, a merge, or rebase, run the following command:

git config --global core.editor <your_editor>

In the place of <your_editor>, add the command associated with your editor of choice:

  • atom: atom --wait
  • emacs: emacs
  • sublime: subl -n -w
  • vi: vi or vim
  • vscode: code --wait