An Alternative to release-please: A Custom SemVer Workflow

Recently, I decided to create a custom semantic versioning GitHub workflow because my team was previously using Google’s release-please. Although release-please is good at automating the release workflow, it didn’t quite fit our needs. Specifically, we needed it to create a draft release instead of publishing a release immediately after the release PR was merged into our main branch. While release-please had a configuration option for draft releases, it proved to be buggy and behaved unexpectedly. Consequently, we couldn’t trust the automation to work as we needed. Additionally, we faced issues with our engineers remembering to use conventional commits, which the tool requires. Given these challenges, it made sense to develop our own custom tooling.

To address this, I worked on creating a custom semantic versioning workflow. The current iteration of the project involves two JS scripts:

  • bump_version.cjs – This script bumps the version of a repository’s package.json and package-lock.json based on the type of bump the user manually selects from the GitHub action (patch, minor, or major).
  • update_changelog.cjs – This script updates the CHANGELOG.md with commits since the last chore(release): PR was merged, as well as the date when the bump_version.yml action was run.

The workflow includes two main components:

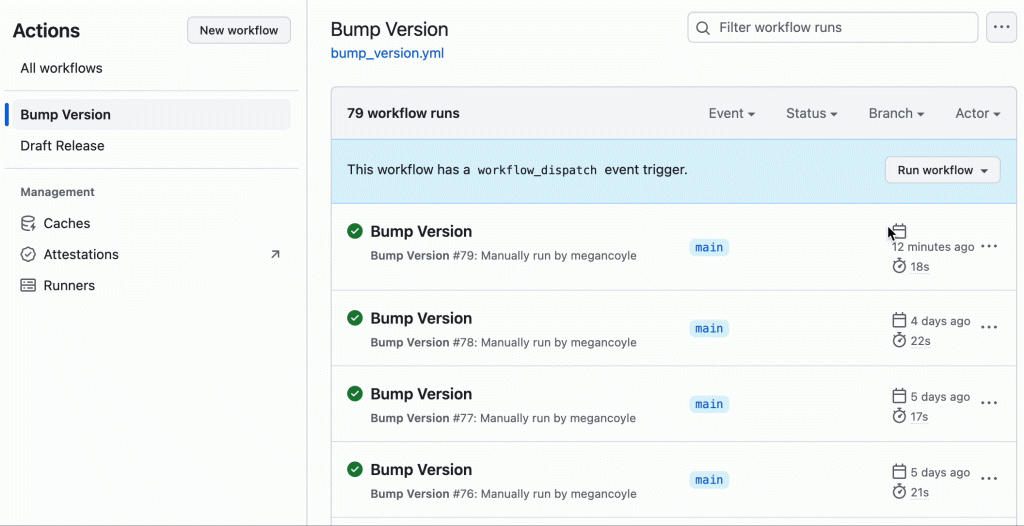
  • bump_version.yml – This manual workflow is triggered when a user selects patch, minor, or major from a dropdown in the GitHub UI (this generates a release PR that bumps the package files and updates the CHANGELOG.md):
  • draft_release.yml – When the release PR is merged, this action is automatically run to create a draft release with the title and tag matching the new bumped version number.

Understanding JavaScript’s “this” Keyword

What is this?

In JavaScript, this is a special keyword that refers to the context in which a function is executed. It can point to different objects depending on how and where the function is called. The value of this is determined at runtime and can change dynamically.

Global Context

In the global context (outside of any function), this refers to the global object. In a browser, this is typically the window object.

console.log(this); // In a browser, this logs the window object

Function Context

Inside a regular function, the value of this depends on how the function is called:

Simple Function Call

When a function is called simply, this refers to the global object (in non-strict mode) or undefined (in strict mode).

function showThis() {
  console.log(this);
}

showThis(); // Logs window (non-strict mode) or undefined (strict mode)

Method Call

When a function is called as a method of an object, this refers to the object the method belongs to.

const person = {
  name: "Megan",
  greet() {
    console.log(this.name);
  }
};

person.greet(); // Logs "Megan"

Constructor Call

When a function is used as a constructor (called with the new keyword), this refers to the new object being created.

function Person(name) {
  this.name = name;
}

const bob = new Person("Megan");
console.log(bob.name); // Logs "Megan"

Arrow Functions

Arrow functions, introduced in ES6, do not have their own this context. Instead, they inherit this from the enclosing lexical context.

const person = {
  name: "Megan",
  greet() {
    const innerFunc = () => {
      console.log(this.name);
    };
    innerFunc();
  }
};

person.greet(); // Logs "Megan"

Explicit Binding

JavaScript provides methods to explicitly set the value of this:

call and apply

Both call and apply invoke a function with a specified this value and arguments. The difference lies in how they handle arguments.

function introduce(greeting) {
  console.log(`${greeting}, I am ${this.name}`);
}

const person = { name: "Megan" };

introduce.call(person, "Hello"); // Logs "Hello, I am Megan"
introduce.apply(person, ["Hi"]); // Logs "Hi, I am Megan"

bind

The bind method creates a new function that, when called, has its this keyword set to the provided value.

const person = { name: "Megan" };

function introduce() {
  console.log(`I am ${this.name}`);
}

const boundIntroduce = introduce.bind(person);
boundIntroduce(); // Logs "I am Megan"

Common Pitfalls and Best Practices

Losing this Context

A common issue arises when methods are passed as callbacks. The this context can be lost.

const person = {
  name: "Megan",
  greet() {
    console.log(this.name);
  }
};

setTimeout(person.greet, 1000); // Logs undefined or throws an error

To preserve this, you can use bind, arrow functions, or store this in a variable.

// Using bind
setTimeout(person.greet.bind(person), 1000);

// Using an arrow function
setTimeout(() => person.greet(), 1000);

// Storing this in a variable
const greet = person.greet;
setTimeout(function() {
  greet.call(person);
}, 1000);

Avoiding Arrow Functions for Methods

Avoid using arrow functions as methods in object literals because they do not have their own this.

const person = {
  name: "Megan",
  greet: () => {
    console.log(this.name);
  }
};

person.greet(); // Logs undefined

Tips to Avoid Layout Thrashing

Layout thrashing happens when JavaScript accesses certain properties that require the browser to recompute the layout of the web page. This process is costly because the browser needs to recalculate the size and position of elements based on their styles and content.

The following JavaScript operations can trigger layout thrashing:

  1. Reading Layout Properties: Accessing properties like offsetWidth, offsetHeight, clientWidth, clientHeight, getComputedStyle, or scrollWidth can trigger layout recalculations.
  2. Modifying Styles and Dimensions: Changing styles (e.g., element.style.width) or adding/removing DOM elements may cause layout changes.

To minimize layout thrashing and improve your web application’s performance, follow these best practices:

  1. Batch DOM Read and Write Operations: Minimize the number of times you read layout-affecting properties (offsetWidth, offsetHeight, etc.) and write to the DOM. Instead, batch these operations together.
    // Bad practice (triggers layout thrashing) 
    const width = element.offsetWidth;
    const height = element.offsetHeight; 
    
    // Better approach (batch reads and writes)
    const styles = getComputedStyle(element);
    const width = element.offsetWidth; // No thrashing here
    const height = element.offsetHeight; // No thrashing here 
    element.style.width = (width + 10) + 'px'; // Apply styles once
  2. Use Classes for Style Changes: Instead of modifying individual style properties directly, leverage CSS classes and toggle them on/off for style changes. This reduces the number of layout recalculations.
    // Bad practice (triggers layout thrashing)
    element.style.width = (element.offsetWidth + 10) + 'px';
    
    // Better approach (uses CSS classes)
    element.classList.add('expanded');
  3. Cache Layout Properties: Store layout-affecting properties in variables to avoid repetitive calculations.
    // Bad practice (repeated layout calculations)
    for (let i = 0; i < elements.length; i++) {
      const width = elements[i].offsetWidth; // Layout thrashing 
      // Use width...
    }
    
    // Better approach (caches layout properties)
    const widths = [];
    for (let i = 0; i < elements.length; i++) {
      widths[i] = elements[i].offsetWidth; // No thrashing 
    // Use widths[i]...
    }
  4. Optimize CSS: Optimize your CSS to minimize layout changes caused by style modifications. Avoid forced synchronous layouts by ensuring efficient CSS rules.

Vue 3 Composition API Lifecycle Hooks

Lately I’ve been working with Vue 3, and I figured it would be helpful to share more insight into this JavaScript framework the more I delve into it. When it comes to Vue’s lifecycle hooks, I think it’s useful to understand when and where you can use them.

Vue 3 lifecycle hooks are special functions that allow you to run code at specific moments in the life of a Vue component. Each hook corresponds to a different phase in the component’s existence, giving you the ability to perform tasks or respond to events at specific times. Let’s break down what each hook does:

onBeforeMount

For tasks that should complete just before the component is mounted, use onBeforeMount. This hook is ideal for actions like pre-fetching data or performing any operations that need to be completed before the component becomes visible.

import { onBeforeMount } from 'vue';

onBeforeMount(() => {
  // Tasks to perform just before mounting
});

onMounted

To interact with the DOM or execute operations after the component has been successfully mounted, use the onMounted lifecycle hook. This is a great time to access and manipulate DOM elements.

import { onMounted } from 'vue';

onMounted(() => {
  // Access and manipulate the DOM
});

onUpdated

When responsiveness to changes in state or props is crucial after an update, you can utilize onUpdated. This hook allows you to react dynamically to modifications in the component’s state or props, enabling you to trigger side effects or additional logic during re-renders.

import { onUpdated } from 'vue';

onUpdated(() => {
  // React to changes in state or props
});

onBeforeUnmount

For cleanup tasks and resource release before a component is unmounted, use onBeforeUnmount. This hook ensures that your component gracefully removes any resources acquired during its lifecycle.

import { onBeforeUnmount } from 'vue';

onBeforeUnmount(() => {
  // Cleanup tasks before unmounting
});

onErrorCaptured

For handling errors occurring within the component’s lifecycle, turn to onErrorCaptured. This hook allows you to catch and manage errors internally or propagate them to a higher level for comprehensive error handling.

import { onErrorCaptured } from 'vue';

onErrorCaptured((error, instance, info) => {
  // Handle errors within the component
});

JavaScript Design Patterns

Design patterns are guidelines for solving common problems in software development. By learning design patterns, you can quickly and easily communicate designs to other software engineers. Here is an overview of some of the common JavaScript design patterns:

Singleton

The Singleton Pattern ensures that a class has only one instance, and provides a global access point to it. This instance can be shared throughout an application, which makes Singletons great for managing global state.

Example:

let instance;

class Example {
  constructor() {
    if (instance) {
      throw new Error("You've already created an instance!")
    }
    this.example = example;
    instance = this;
  }

  getExample() {
    return this.example;
  }
}

Pros to using the Singleton Pattern

✅ You can potentially save a lot of memory since you don’t have to set up memory for a new instance.

Cons to using the Singleton Pattern

We no longer need to explicitly create Singletons since ES2015 Modules are Singletons by default.

The global variables are accessible throughout the code. This can lead to problems like race conditions.

When importing a module, it might not be obvious that the module is importing a Singleton which can lead to unexpected value changes within the Singleton.

Proxy

The Proxy pattern uses a Proxy to serve as an interface to control interactions to target objects.

Example:

const targetObject = {
  name: "User",
  message: "hello world"
}

const handler = {
  get(targetObject, prop, receiver) {
    return "!";
  }
}

const proxy = new Proxy(targetObject, handler);

console.log(proxy.message); // !

Pros to using the Proxy Pattern

✅ It’s easier to add functionality with specific objects (i.e. logging, debugging, notifications, validation, etc).

Cons to using the Proxy Pattern

Could cause performance issues from executing handlers on every object.

Observer

The Observer Pattern is the most commonly used design pattern in the real world. It defines a one-to-many dependency between objects so that when one object changes its state, all of its dependents are notified and updated automatically.

Example:

class Observable {
  constructor() {
    this.observers = [];
  }

  subscribe(exampleFunction) {
    this.observers.push(exampleFunction);
  }

  unsubscribe(exampleFunction) {
    this.observers = this.observers.filter((observer) => observer !== exampleFunction);
  }
 
  notify(data) {
    this.observers.forEach((observer) => observer(data));
  }
}

Pros to using the Observer Pattern

✅ Observer objects (that handle the received data) can be decoupled/coupled easily with the observable object (monitors the events).

Cons to using the Observer Pattern

Could potentially have performance issues because of the time it takes to notify all subscribers (i.e. if there are too many subscribers, if the logic becomes too complicated).

Factory

The Factory Pattern wraps a constructor for different types of objects and returns instances of the objects.

Example:

const createItem = (name, message) => ({
  createdAt: Date.now(),
  name,
  message,
  quote: `${name} said "${message}"`,
});

createItem("User", "Hello World!");

Pros to using the Factory Pattern

✅ Keeps code DRY and is handy when we need to create several objects that share the same properties.

Cons to using the Factory Pattern

Might be more memory efficient to create new instances instead of new objects.

Prototype

The Prototype Pattern creates new objects and returns objects that are initialized with values copied from the prototype. It is a helpful way to share properties among many objects of the same type.

Example:

const createUser = (name, message) => ({
  name,
  message,
  speak() {
    console.log(`${name} said "${message}"`);
  },
  walking() {
    console.log(`${name} is walking!`);
  },
});

const user1 = createUser("Jill", "Hello world!");
const user2 = createUser("Jack", "Good morning!");

Pros to using the Prototype Pattern

✅ More efficient with memory since we can access properties that aren’t defined directly on the object. This allows us to avoid duplication of properties and methods.

Cons to using the Prototype Pattern

Issues with readability – if a class is extended quite a few times, it can be hard to know where specific properties come from.

Additional Resources

patterns.dev
JavaScript Closures

JavaScript closures allow functions to remember the scope in which they were created, even when they are executed outside that scope. This ability to capture and retain the lexical scope is what makes closures a powerful feature.

How Closures Work

To understand closures, it’s essential to grasp the concept of lexical scope. Lexical scope refers to the way in which variable names are resolved in nested functions. Closures come into play when a function is defined within another function, creating a chain of lexical scopes.

When an inner function is returned from its outer function, it carries with it a reference to the entire scope chain in which it was defined. This reference allows the inner function to access variables and parameters from its outer function, even after the outer function has finished executing. This behavior is the essence of closures.

Practical Examples

Let’s explore a few practical examples to illustrate how closures work in real-world scenarios. We’ll look at scenarios such as data encapsulation, private variables, and callback functions to showcase the versatility and usefulness of closures.

  1. Data Encapsulation: Closures provide a way to encapsulate data within a function, preventing external code from directly accessing or modifying it. This promotes data integrity and reduces the likelihood of unintended side effects.
function createCounter() {
  let count = 0;

  return function() {
    count++;
    return count;
  };
}

const counter = createCounter();
console.log(counter()); // Output: 1
console.log(counter()); // Output: 2

In this example, the createCounter function returns an inner function that has access to the count variable. The returned function serves as a counter, and the count variable is protected from external manipulation.

  1. Private Variables: Closures enable the creation of private variables within a function, allowing you to hide implementation details and expose only the necessary interfaces.
function createPerson(name) {
  let privateAge = 0;

  return {
    getName: function() {
      return name;
    },
    getAge: function() {
      return privateAge;
    },
    setAge: function(newAge) {
      if (newAge >= 0) {
        privateAge = newAge;
      }
    },
  };
}

const person = createPerson("John");
console.log(person.getName()); // Output: John
console.log(person.getAge()); // Output: 0
person.setAge(25);
console.log(person.getAge()); // Output: 25

In this example, the createPerson function returns an object with methods to access and modify private data (privateAge). This encapsulation ensures that the internal state of the object remains controlled.

  1. Callback Functions: Closures are commonly used in the context of callback functions. When a function is passed as an argument to another function and is executed later, it forms a closure, retaining access to the variables in its lexical scope.
function delayMessage(message, delay) {
  setTimeout(function() {
    console.log(message);
  }, delay);
}

delayMessage("Hello, World!", 2000);

In this example, the anonymous function inside setTimeout forms a closure, allowing it to access the message variable from the outer delayMessage function even after delayMessage has finished executing.

JavaScript closures provide developers with tools for creating modular, maintainable, and efficient code. By understanding how closures work and applying them judiciously, you can elevate your JavaScript programming skills and build robust applications.

JavaScript Iterators

Iterators in JavaScript refer to objects that provide a sequential method of accessing elements within a collection. Collections include data structures like arrays, strings, maps, and sets. Iterators offer a standardized approach to traversing these collections, providing a controlled and flexible alternative to traditional loops.

Creating an Iterator

Iterators include a method, within an object, named Symbol.iterator, responsible for returning an iterator object:

const myIterable = {
  [Symbol.iterator]: function () {
    // Insert iterator logic here
  },
};

The iterator object, in turn, must include a method named next, returning an object with value and done properties. The value property signifies the current element in the iteration, while the done property is a boolean indicating whether more elements are available for iteration.

const myIterator = {
  next: function () {
    // return { value: ..., done: ... }
  },
};

Working with Iterators

Many data structures, including arrays, strings, maps, and sets, inherently implement iterators:

const myArray = [1, 2, 3, 4, 5];
const arrayIterator = myArray[Symbol.iterator]();

console.log(arrayIterator.next()); // { value: 1, done: false }
console.log(arrayIterator.next()); // { value: 2, done: false }
console.log(arrayIterator.next()); // { value: 3, done: false }
// Iteration continues until done is true

Enhancing Code Readability

One of the main benefits of iterators is the improvement of code readability. By abstracting away the intricacies of looping, iterators allow developers to concentrate on the logic within the loop, rather than managing indices or counting iterations. This results in more concise and expressive code.

const myArray = [1, 2, 3, 4, 5];

// Traditional for loop
for (let i = 0; i < myArray.length; i++) {
  console.log(myArray[i]);
}

// Using iterator
const arrayIterator = myArray[Symbol.iterator]();
let iterationResult = arrayIterator.next();

while (!iterationResult.done) {
  console.log(iterationResult.value);
  iterationResult = arrayIterator.next();
}

Use Cases for Iterators

By offering a standardized interface for iterating over elements, iterators simplify the integration of custom objects into existing code. Additionally, iterators play a fundamental role in the for...of loop introduced in ECMAScript 6. This loop streamlines the process of iterating over iterable objects, resulting in more readable and concise code.

Understanding the Event Loop in JavaScript

What is the Event Loop?

The event loop is a continuous process that enables JavaScript to execute code, handle events, and manage asynchronous tasks. Unlike synchronous languages, JavaScript is single-threaded, meaning it can only execute one operation at a time. The event loop ensures that asynchronous operations, such as fetching data or handling user input, can be managed without blocking the main thread.

Phases of the Event Loop

The event loop consists of multiple phases, each playing a specific role in handling different types of tasks. Understanding these phases is crucial for grasping how JavaScript manages its execution flow.

  1. Call Stack:
    • The call stack is where synchronous code is executed.
    • Functions are pushed onto the stack and popped off when they complete.
  2. Callback Queue:
    • Asynchronous operations, such as API calls or user interactions, are processed in the callback queue.
    • Callbacks from these operations are queued up to be executed once the call stack is empty.
  3. Event Loop:
    • The event loop constantly checks if the call stack is empty.
    • If the stack is empty, it moves callbacks from the queue to the stack for execution.
  4. Microtask Queue:
    • Microtasks are high-priority tasks that are executed before the next event loop cycle.
    • Promises and certain APIs schedule tasks in the microtask queue.

How the Event Loop Handles Asynchronous Operations

Let’s take a look at how the event loop manages asynchronous tasks:

  1. setTimeout:
    • setTimeout allows you to schedule a function to run after a specified delay.
    • The specified function is added to the callback queue after the delay.
  2. Promises:
    • Promises are a powerful tool for handling asynchronous operations.
    • They use the microtask queue, ensuring their callbacks are executed before the next event loop cycle.
  3. Async/Await:
    • Async/Await, built on top of Promises, provides a more readable way to work with asynchronous code.
    • Under the hood, it still relies on the event loop and the microtask queue.

Understanding JavaScript Promises

JavaScript, as a versatile and dynamic programming language, has evolved over the years to offer developers powerful tools for handling asynchronous operations. Promises, introduced in ECMAScript 6 (ES6), have become a fundamental part of modern JavaScript development. Let’s take a look at what JavaScript promises are, as well as focusing on the micro-task queue and callback queue, which are crucial components in the asynchronous execution model.

JavaScript Promises

Promises are objects representing the eventual completion or failure of an asynchronous operation. They provide a cleaner and more structured way to handle asynchronous code compared to traditional callback functions. A promise can be in one of three states: pending, fulfilled, or rejected.

  1. Promise States:
    • Pending: The initial state when a promise is created.
    • Fulfilled: The state when the asynchronous operation is successfully completed.
    • Rejected: The state when the asynchronous operation encounters an error or fails.
  2. Creating Promises
    • Promises can be created using the Promise constructor. This constructor takes a function (executor) as its argument, which in turn takes two parameters: resolve and reject. Developers use these functions to signal the completion or failure of the asynchronous operation.
const myPromise = new Promise((resolve, reject) => {
  // Asynchronous operation
  if (operationSuccessful) {
    resolve(result);
  } else {
    reject(error);
  }
});

Micro-Task Queue

The micro-task queue is a key component in JavaScript’s event loop mechanism, responsible for handling micro-tasks. Micro-tasks are tasks that have higher priority than regular tasks and are executed after the current script has run to completion. Promises use the micro-task queue to schedule their callbacks.

  1. Micro-Tasks:
    • Micro-tasks include promise callbacks, process.nextTick, and Object.observe.
    • Micro-tasks are executed in a single cycle of the event loop, ensuring they are processed before the next rendering.
  2. Promise Execution Order:
    • When a promise is fulfilled or rejected, its callback is added to the micro-task queue.
    • Micro-tasks are executed in order, allowing promises to be resolved before other tasks in the callback queue.

Callback Queue

The callback queue, also known as the task queue or message queue, is another integral part of the event loop. It stores tasks that are ready to be executed, allowing asynchronous operations to be handled in a non-blocking manner.

  1. Callback Execution:
    • Tasks in the callback queue are executed after the micro-tasks.
    • Regular tasks, such as event handlers and I/O operations, are added to the callback queue.
  2. Order of Execution:
    • The event loop continuously checks the micro-task queue and executes micro-tasks before moving to the callback queue.
    • This order ensures that promises are resolved before other asynchronous operations in the callback queue.

JavaScript promises have transformed the way developers handle asynchronous code, offering a cleaner and more maintainable approach compared to traditional callbacks. Understanding the micro-task queue and callback queue is crucial for mastering the intricacies of the event loop and ensuring the efficient execution of asynchronous operations in JavaScript. As you delve deeper into asynchronous programming, a solid grasp of promises and the event loop will empower you to build robust and responsive applications.

What is the Difference Between null, NaN, and undefined in JavaScript?

The other day I was thinking about how earlier last year, I was interviewing like crazy, and sometimes I had recruiter phone screens where I was quizzed on various JavaScript terms. As I think of some of the questions I’ve been asked previously, I plan to write articles focusing on these questions and answers.

NaN

NaN means Not a number, and it denotes the value of an object is not a number. If you look at typeof NaN it will return 'number' since NaN is a numeric data type that is undefined as a real number. NaN can be returned if you do one of the following:

  1. Convert undefined into a number
  2. Convert a non-numeric string into a number
  3. Divide zero by zero
  4. Divide infinity by infinity
  5. Operation where the result is not a real number
  6. Method/expression’s operand is or gets coerced to NaN

null

null means the object is empty. It’s an assignment value that can be assigned to a variable that has no value.

undefined

undefined means that the object doesn’t have any value and is undefined. This happens when you declare a variable and don’t assign a value to it.